Secrets to Seared Scallops: The Power of Dry Scallops & High Heat Explained
There's an undeniable magic to perfectly seared scallops. That elusive golden-brown crust, giving way to a sweet, tender, almost buttery interior, makes them a highlight on any restaurant menu. Many home cooks shy away, believing this culinary feat is reserved for professional chefs. The truth, however, is far simpler and more accessible than you might imagine. With just a few key techniques focused on dry scallops and high heat, you can consistently achieve restaurant-quality results in your own kitchen in mere minutes.
Forget complex marinades or lengthy preparations; the secret to unlocking the full potential of these delicate shellfish lies in mastering two fundamental principles. Once you understand the "why" behind keeping scallops dry and using a screaming hot pan, you'll transform from an apprehensive home cook to a confident scallop-searing master.
The Golden Rule: Why Dry Scallops and High Heat Are Non-Negotiable
If you've ever tried to sear scallops and ended up with a pale, rubbery mess, moisture was likely the culprit. The goal of searing is to achieve the Maillard reaction—a chemical process responsible for the browning and development of complex flavors that we associate with a perfect crust. Water, unfortunately, is the enemy of this reaction.
- The Power of Dry Scallops: Any moisture on the surface of the scallop will turn into steam the moment it hits the hot pan. This steaming effect prevents direct contact between the scallop's surface and the pan, actively inhibiting caramelization and the formation of that coveted golden crust. Instead of searing, your scallops will essentially poach in their own liquid, resulting in a bland, chewy texture.
- The Necessity of High Heat: Paired with dryness, high heat is the other critical component. A hot pan allows for rapid surface browning while ensuring the interior remains succulent and tender. If the pan isn't hot enough, the scallops will take too long to develop a crust, leading to an overcooked, rubbery center. The intense heat creates that beautiful, flavorful crust quickly, sealing in the natural sweetness and moisture.
Understanding this dynamic duo—eliminating moisture and applying intense heat—is the cornerstone of achieving consistently amazing seared scallops. It's not just about cooking them; it's about transforming them.
Prepping for Perfection: Selecting & Preparing Your Scallops
The journey to perfect seared scallops begins long before they hit the pan. Thoughtful selection and meticulous preparation lay the groundwork for success.
Choosing the Right Scallops: Wet vs. Dry
When purchasing scallops, you might encounter two main types: "wet-packed" and "dry-packed."
- Wet-Packed Scallops: These are often treated with a phosphate solution (STP) to preserve them and extend shelf life. While this treatment makes them appear plump, it also causes them to absorb a significant amount of water. This excess moisture makes it incredibly difficult to achieve a proper sear, often leading to a steamed texture and a less intense flavor.
- Dry-Packed Scallops: These are untreated and are usually labeled as "day boat" or "dry." They are naturally firmer, have a slightly off-white to creamy color, and a purer, sweeter flavor. Always opt for dry-packed scallops if available, as they are inherently easier to sear to perfection.
Regardless of whether you choose fresh or frozen, look for scallops that are firm, plump, and have a fresh, briny smell. If using frozen scallops, ensure they are thawed completely in the refrigerator, preferably overnight.
The Crucial Step: Removing the Side Muscle & Drying
Once you have your scallops, there are two non-negotiable prep steps:
- Remove the Side Muscle: Each scallop typically has a small, tough muscle attached to its side. It looks like a small, firm tab, noticeably denser than the rest of the scallop. This muscle can become rubbery and unpleasant when cooked, so it's essential to gently peel it off and discard it.
- Achieve Ultimate Dryness: This is arguably the most critical step. Even "dry-packed" scallops will have some surface moisture. Lay the scallops on a layer of paper towels, then top them with another layer of paper towels and gently press down. Repeat this process until the paper towels come away completely dry. For an extra measure, you can place the blotted scallops on a wire rack set over a baking sheet and refrigerate them for 15-30 minutes. This allows any residual surface moisture to evaporate, ensuring an optimal sear.
Remember, a perfectly dry scallop is a perfectly seared scallop waiting to happen.
Mastering the Sear: Technique and Timing for Restaurant-Quality Scallops
With your scallops prepped and ready, it's time for the main event. This is where high heat and careful technique come into play.
Pan & Oil Selection
- The Right Pan: Avoid non-stick pans for searing seared scallops. Non-stick coatings struggle with the high temperatures needed for proper caramelization and can even be damaged. A heavy-bottomed stainless steel pan or a well-seasoned cast-iron skillet are your best choices. These pans retain heat exceptionally well, crucial for an even sear.
- High Smoke Point Oil: Given the high heat required, choose an oil with a high smoke point. Grapeseed oil, canola oil, and vegetable oil are excellent options. Reserve your flavorful olive oil for a finishing drizzle after cooking, as its lower smoke point and delicate aromatics are not ideal for the initial sear.
The Searing Process
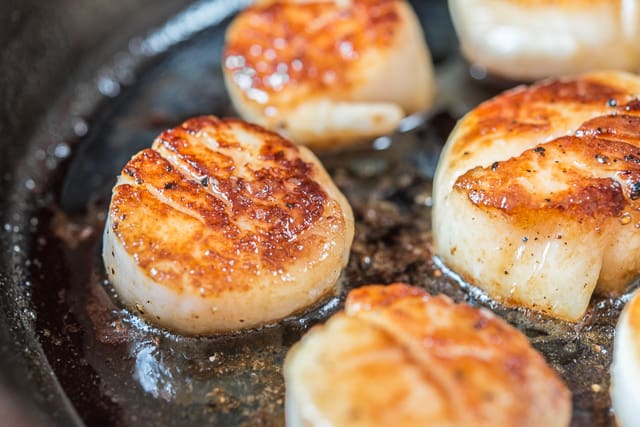
- Heat the Pan: Place your chosen pan over medium-high to high heat. Allow it to heat thoroughly for 2-3 minutes. You should see a faint wisp of smoke or feel intense heat radiating from the pan when you hold your hand an inch above it.
- Add Oil: Add a tablespoon or two of your high smoke point oil to the hot pan. Swirl to coat and wait for it to shimmer slightly.
- Season & Sear: Season your impeccably dry scallops with a generous pinch of salt and freshly ground black pepper just before placing them in the pan. Carefully arrange the scallops in a single layer, ensuring they are not overcrowded. Overcrowding will lower the pan's temperature and cause the scallops to steam instead of sear. Cook in batches if necessary.
- Patience is Key: Once the scallops are in the pan, resist the urge to move them! Let them sear undisturbed for 2 to 3 minutes, depending on their size. This is crucial for developing that gorgeous, golden-brown crust and ensures they release easily from the pan. For more details on this, explore our guide: Unlock Golden Crust: Essential Tips for Perfect Seared Scallops.
- Flip & Finish: Using tongs, gently flip each scallop. You should see a beautiful, deep golden-brown crust. Sear the second side for another 1 to 2 minutes. In the last minute, you can add a knob of butter, a smashed garlic clove, or a sprig of fresh thyme to the pan to infuse the scallops with extra flavor. Spoon the melting butter over the scallops as they finish cooking.
- Remove Immediately: Scallops cook very quickly. They are perfectly done when they are opaque throughout but still incredibly tender and juicy in the center. Overcooking will render them rubbery. Remove them from the pan immediately onto a serving plate.
Serving Suggestions & Beyond
Seared scallops are incredibly versatile and can elevate any meal. Whether it's a romantic date night, an elegant dinner party, or a quick weeknight treat, they fit the bill.
Serve them simply with a squeeze of fresh lemon and a sprinkle of chopped parsley, allowing their natural sweetness to shine. They also pair beautifully with:
- Creamy risotto (lemon or asparagus risotto are fantastic choices)
- Light pasta dishes with a white wine butter sauce
- A fresh, vibrant green salad with a citrus vinaigrette
- Roasted asparagus, green beans, or broccolini
- Creamy mashed potatoes or a delicate polenta
For more inspiration on pairing and plating, check out: Achieve Perfect Seared Scallops: Easy Restaurant-Quality at Home.
Conclusion
The allure of perfectly seared scallops is within your reach. By understanding and diligently applying the principles of ensuring utterly dry scallops and utilizing incredibly high heat, you can consistently achieve that restaurant-quality golden crust and tender interior. Don't be intimidated by their gourmet reputation; with a little attention to these key details, you'll be creating luxurious, flavorful dishes that impress every time. So grab your scallops, blot them dry, heat that pan, and prepare to unlock the secrets to truly sensational seafood.
