There's an undeniable allure to a plate of perfectly seared scallops. That tantalizing golden-brown crust, giving way to a sweet, tender, and buttery interior, often feels like a luxury reserved for high-end restaurants. Yet, the truth is, mastering perfect seared scallops in your own kitchen is surprisingly straightforward. It doesn't require an advanced culinary degree or specialized equipment, just a few key techniques and a little patience.
For many, the idea of cooking scallops at home can be intimidating. Their delicate nature might suggest they're prone to being overcooked or difficult to get just right. However, with the right approach, you can consistently achieve that coveted restaurant-quality sear and succulent texture. Forget complex marinades or lengthy preparations; the magic of seared scallops lies in simplicity and precision. In as little as 15 minutes, you can transform these exquisite mollusks into a show-stopping dish perfect for a romantic date night, an elegant dinner party, or even a quick yet impressive weeknight meal.
The Foundation: Starting with the Right Scallops
The journey to perfect seared scallops begins long before they hit the hot pan. Choosing the right type of scallop and preparing them correctly is paramount to achieving that beautiful golden crust and delicate texture.
Wet vs. Dry Scallops: A Crucial Distinction
- Dry Scallops: These are the gold standard for searing. "Dry" scallops are natural, untreated, and have not been soaked in a phosphate solution. They have a slightly off-white to pinkish hue and a natural, subtly sweet aroma. Because they contain less moisture, they caramelize beautifully, forming that desirable crust.
- Wet Scallops: Often treated with sodium tripolyphosphate (STP), these scallops appear bright white and may feel slightly slimy or puffy. The phosphate causes them to absorb excess water, increasing their weight (and thus, cost) and making them much harder to sear properly. The extra moisture steams the scallops instead of searing them, leading to a rubbery texture and preventing browning. Always opt for dry scallops if possible. If you can only find wet scallops, you'll need to work extra hard to pat them dry, but the results will still likely be inferior.
Preparing Your Scallops for Perfection
Once you've acquired your pristine scallops, a little prep work goes a long way:
- Remove the Side Muscle: Each scallop has a small, crescent-shaped muscle attached to its side. This fibrous tab is noticeably firmer than the rest of the scallop. If left on, it becomes tough and rubbery when cooked, detracting from the otherwise tender experience. Gently pinch and peel this muscle off with your fingers. It should come away easily.
- Pat Them Bone-Dry: This is arguably the most critical step for achieving a proper sear. Any residual moisture on the scallop's surface will turn to steam when it hits the hot pan, preventing the Maillard reaction (the chemical process responsible for browning and flavor development). Lay your scallops on a clean kitchen towel or several layers of paper towels, then cover them with another layer and gently press down. Repeat this process until the scallops are as dry as possible. This step cannot be overstated – dry scallops are happy scallops when it comes to searing.
- Fresh vs. Frozen: While fresh, dry scallops are ideal, good quality frozen scallops can work too. Just be sure to thaw them completely in the refrigerator overnight, then pat them exceptionally dry before cooking, as frozen scallops tend to retain more moisture.
- Season Simply: A generous sprinkle of coarse salt and freshly ground black pepper just before cooking is all these delicate morsels need. Resist the urge to season too far in advance, as salt can draw moisture out of the scallops.
Mastering the Sear: Heat, Oil, and Technique
With your scallops prepped, the next stage is all about creating the perfect cooking environment. This involves selecting the right pan, using the correct oil, and understanding how to manage your heat.
The Right Pan Makes All the Difference
Forget your non-stick pans for this task. While convenient for some dishes, non-stick coatings are not designed to withstand the high temperatures required for searing, and they actually inhibit the formation of that beautiful crust. Instead, reach for:
- Stainless Steel Frying Pan: A good quality stainless steel pan is excellent for searing. It heats evenly, retains heat well, and allows for superior caramelization.
- Well-Seasoned Cast Iron Skillet: Cast iron is another fantastic choice. It holds heat exceptionally well, providing a consistent, intense surface temperature that is perfect for developing a deep, rich crust.
Choosing the Correct Oil and Achieving High Heat
When cooking at high temperatures, the type of cooking fat you use matters. You need an oil with a high smoke point:
- High Smoke Point Oils: Vegetable oil, canola oil, grapeseed oil, or even clarified butter (ghee) are excellent choices. They can withstand the intense heat without burning, which would impart an unpleasant flavor.
- Olive Oil: Regular olive oil has a lower smoke point and is best reserved for finishing a dish or for lower-temperature cooking.
Heat your chosen pan over medium-high to high heat. Add just enough oil to lightly coat the bottom of the pan. You'll know the pan is ready when the oil begins to shimmer, or just barely smoke. This screaming hot surface is essential for instantly caramelizing the scallop when it makes contact. Without this intense heat, you won't get the crust you're looking for.
The Searing Technique: Patience and Space
Place the dried, seasoned scallops into the hot pan, making sure to leave ample space between each one. Do not overcrowd the pan. Overcrowding will drop the pan's temperature, leading to steaming rather than searing. If you have too many scallops, cook them in batches. Lay each scallop flat, ensuring good contact with the pan's surface.
Once the scallops are in the pan, resist the urge to move them. This is where patience comes in. Let them cook undisturbed for a full 3 minutes. This allows the radiant heat to work its magic, developing that gorgeous golden crust and helping the scallops release easily from the pan when it's time to flip. You can learn more about this critical interplay of factors in our article Secrets to Seared Scallops: Dry Scallops & High Heat Explained.
The Art of Timing: When to Flip and How Long to Cook
Timing is everything when it comes to preventing overcooked, rubbery scallops. The goal is a beautifully caramelized exterior and a tender, almost translucent center.
The First Side: The Golden Rule
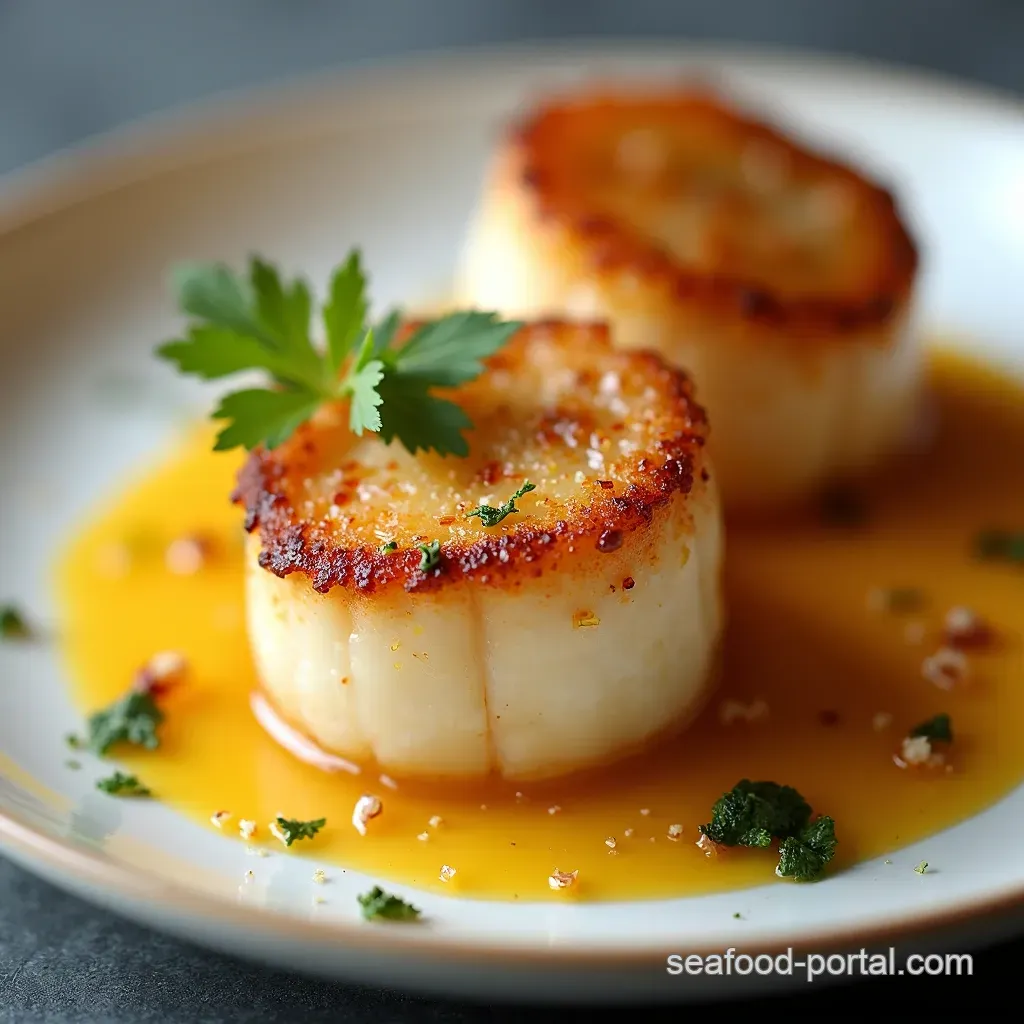
As mentioned, cook the first side for a solid 3 minutes. You should see a rich, golden-brown crust forming when you peek underneath with tongs or a spatula. This crust will also indicate that the scallop is ready to release from the pan easily.
Flipping and Finishing
Once that perfect crust is achieved, flip the scallops. Immediately add a tablespoon or two of butter to the pan. The butter will melt, enriching the flavor and helping to finish the second side. You can also add aromatics like minced garlic or a sprig of fresh thyme to infuse the butter with extra flavor. Briefly baste the scallops with the melting butter as they cook.
The cooking time for the second side will be significantly shorter than the first, typically only 1 to 3 minutes, depending on the size of your scallops. Large 10/20 count scallops (meaning 10-20 scallops make up a pound) might need 2-3 minutes per side, while smaller scallops will cook faster.
Knowing When They're Done
Seared scallops are done when they are opaque around the edges but still have a slight translucency in the very center. They should feel firm to the touch but still have some give. Overcooked scallops will be completely opaque throughout and feel very firm and rubbery. Remove them from the pan immediately once they reach this stage to prevent them from cooking further from residual heat.
Serving Suggestions & Elevating Your Dish
Once your scallops are perfectly seared, they are ready to be the star of your meal. Their delicate, sweet flavor pairs beautifully with a variety of accompaniments.
Classic Pairings
- Creamy Risotto: A luxurious match, especially a lemon or asparagus risotto.
- Pasta: Toss with a light lemon-garlic butter sauce, cherry tomatoes, and fresh herbs.
- Fresh Salad: Serve atop a bed of mixed greens with a vinaigrette for a lighter option.
- Potatoes: Mashed potatoes, roasted new potatoes, or even a simple potato gratin.
- Roasted Vegetables: Asparagus, green beans, or broccolini tossed with olive oil and garlic.
Elevating with Simple Sauces
While delicious on their own, a quick pan sauce can take your seared scallops to the next level:
- Lemon-Butter Sauce: After removing the scallops, deglaze the pan with a splash of white wine, a squeeze of lemon juice, and a knob of butter. Swirl until emulsified, then drizzle over the scallops. Add fresh parsley or chives for garnish.
- Garlic Herb Sauce: Sauté minced garlic and fresh herbs (like thyme or tarragon) in the leftover pan drippings with a little extra butter.
Conclusion
From their initial intimidation factor to the final moment of culinary triumph, perfectly seared scallops are one of the most rewarding dishes you can master at home. By focusing on a few simple yet crucial techniques—starting with dry, properly prepped scallops, using a hot pan with a high smoke point oil, and exercising patience—you can consistently achieve that irresistible golden crust and tender, buttery interior. So, don't shy away from these luxurious mollusks. Embrace the simplicity, follow these essential tips, and unlock the golden crust that will make your home-cooked scallops rival any five-star restaurant.
